
Traveller
Build optimized visit plans for a sales rep. The Traveller guides you through four steps: pick the days and where the rep starts, split the rep's customers into areas and give each day its areas, calculate the routes, and save the visits to the calendar.
Getting Started
Navigate to Traveller from the main menu. The four steps are listed on the left, with an interactive map on the right. A step stays locked until the one before it is complete; hover over the lock to see what is missing.
The Traveller works with the customers the rep sees: the ones that carry the rep's salesman code. Planner areas organise those customers by day; they don't change which customers the rep has. See What a Rep Sees.
Step 1: Planning Days, Departure & Arrival
Choose the days, where the rep starts and ends, and how long the visits take.
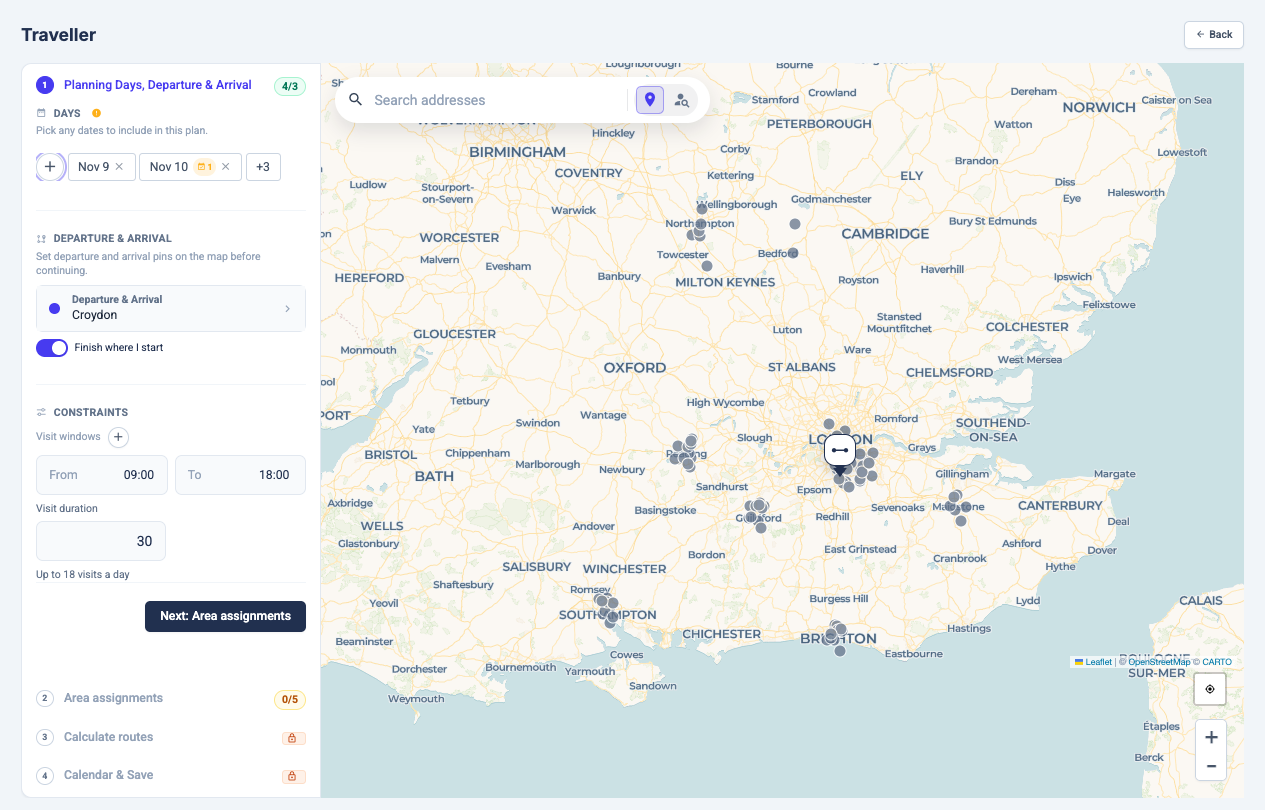
The map shows the rep's customers in a single colour in this step. Areas appear from step 2.
Select a Salesperson
If you plan for other people, choose the Salesperson first. With more than one sales team, pick the team, then the person; people in no team are under No team.
When you plan for a rep, the visits go to the rep's calendar, and the areas you build and save are the rep's.
Choose the Days
Click + next to Days and pick any dates. The shortcuts Today, Tomorrow (or Next Monday), This week and Next week select common ranges.
A day that already has visits carries a badge with how many. If the days you pick are already in a plan saved from the Traveller, a notice offers Replace plan: the plan's visits that aren't done yet come off the calendar, and Undo in the confirmation puts them back.
Set Departure & Arrival
Click the Departure row to place a pin on the map, or to choose a saved departure and arrival pair. You can also search for an address in the map's search box.
Turn on Finish where I start to end every day where it starts. Click a placed pin to move it, or to save the pair under a name for next time.
Constraints
| Setting | Description |
|---|---|
| Visit windows | Time ranges when visits can happen. Add more than one to leave a lunch break |
| Visit duration | Average minutes spent with each customer |
The number of visits per day follows from the two: the panel shows it as Up to 18 visits a day, for example.
Click Next: Area assignments when the days and the departure are set.
Step 2: Area Assignments
Split the rep's customers into areas, and give each day its areas.
Customer Filters
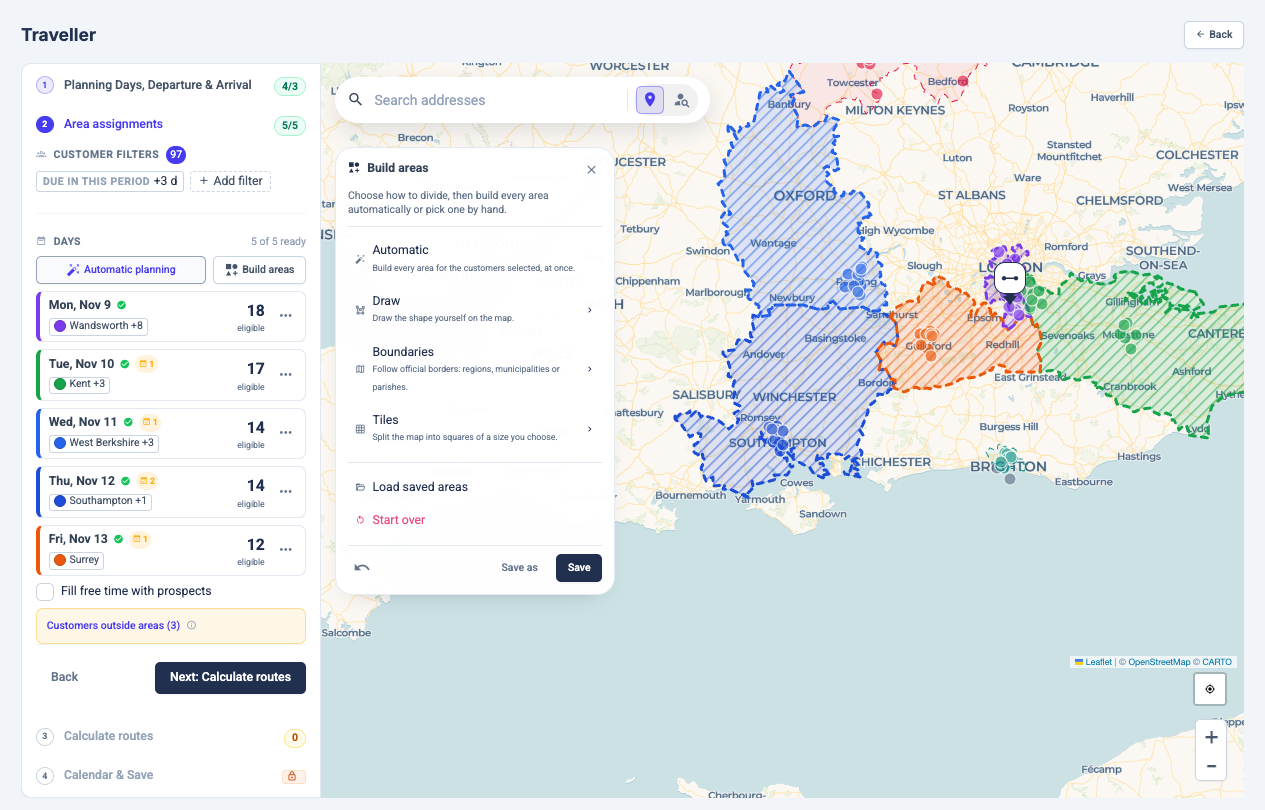
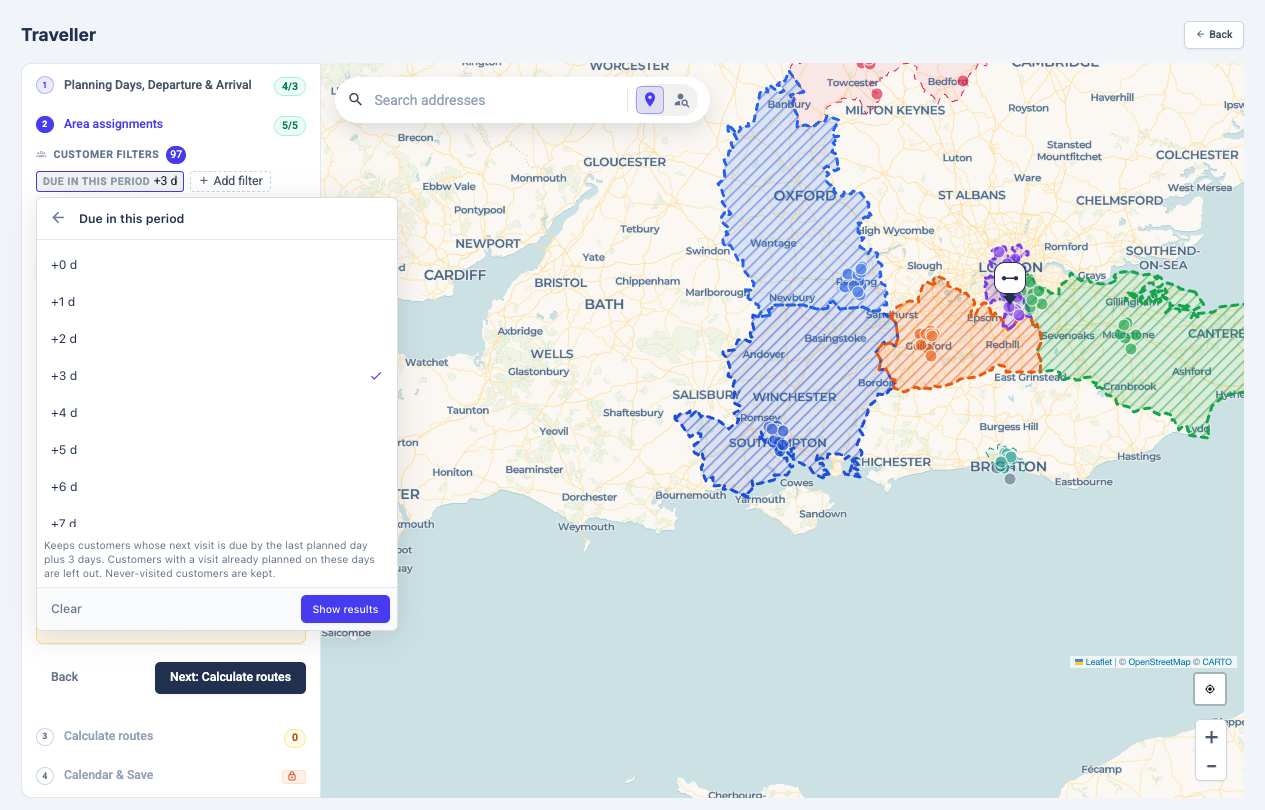
Customer filters decide which customers the plan uses; the number next to it counts them. Due in this period is on by default: it keeps customers whose next visit is due by the last planned day plus the days you choose, and leaves out customers who already have a visit planned. Add filters for categories, segments, agreements, stage, district, city, postcode, sales trend or custom fields.
Changing the filters after areas were built offers Suggest again, to rebuild them, or Keep areas.
Automatic Planning
Click Automatic planning to build areas of about one day of visits each and give every day its areas, nearest to the day before. Customers left more than 1 km from any area are listed so you can rebuild the areas to include them.
When there are already areas on the map, choose Create new areas to start again, or Assign days to these areas to keep your areas and fill only the days that have none.
Build Areas
Click Build areas to open the Build areas box on the map and choose how to divide:
| Option | How it works |
|---|---|
| Automatic | Builds every area at once for the customers selected |
| Draw | Draw the shape yourself: Polygon (click points, then the first one again) or Freehand |
| Boundaries | Follows official borders: Regions, Municipalities or Parishes |
| Tiles | Splits the map into squares of 2 to 12 km |
With Boundaries or Tiles, choose Automatic to build every area, or Manual to click regions or squares on the map and then Add area.
The box also has Load saved areas, Start over, Save as and Save. Closing the box keeps your changes.
Temporary Areas
An area you build is temporary until you save it: it has a dashed border, it serves this plan, and it is gone when you leave the Traveller. To use the areas again next time, click Save. See Saved Areas.
Edit an Area
Click an area on the map to see its eligible customers and how it was built, and to give it days. From there you can:
- Rename it with the pencil
- Edit shape to reshape it
- Split it, by drawing around the part that becomes a new area
- Merge with… a neighbouring area
- Delete it: click Delete, then Delete area? to confirm
Deleting an area doesn't move or delete any customer.
Give Days Their Areas
Each day appears as a card with its areas and how many customers are eligible. Click a day, then click areas on the map to add or take them away, and click Done. You can also drag a day card onto an area. One day can cover several areas, and one area can serve several days.
Customers with a visit already booked on another day carry an Already planned tag.
Customers Outside Areas
When some customers fall outside every area, Customers outside areas lists them. Click a customer to find it on the map, then widen an area or leave the customer for another plan.
Saved Areas
Saved areas let a rep reuse the same division of the map from one plan to the next.
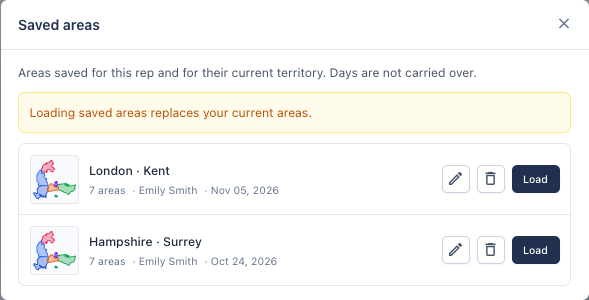
- Save stores the areas on the map. The first time, they are saved as My areas; after that, Save updates the saved areas in use.
- Save as stores them under a new name and makes them the ones in use.
- Load saved areas lists the areas saved for the rep and for the rep's current territory. Load replaces the areas on the map; you are asked first if you have unsaved changes.
- Use the pencil to rename saved areas, and the bin, then Delete, to delete them. Deleting saved areas can't be undone.
The Traveller opens on the saved areas in use. Days are never saved with the areas: give the days their areas again after loading.
Saved areas follow the territory. When a territory moves to another rep in Territory Studio, or through a hand-over, the new rep can load the areas saved for it; the line Inherited from shows where they came from. A rep who loses the territory no longer sees those areas.
Start over clears the map. If there are areas, you are asked whether to save them first; areas you don't save can't be recovered.
Planner Areas
Planner areas belong to one rep and serve one job: grouping the rep's customers so each day of a plan covers one part of the map. The colour of an area only tells areas apart; it doesn't stand for a rep.
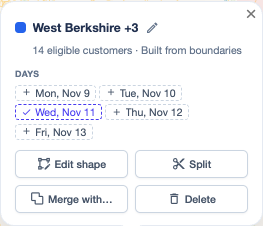
Click an area on the map to see how many eligible customers it has, how it was built and which days it serves.
Planner Areas Are Not Territories
WiseParts uses the word "area" for other things too. None of them is a planner area, and only one can change which customers a rep sees:
| Area | What it is | Where you manage it | Changes what a rep sees? |
|---|---|---|---|
| Planner areas | Zones that split a rep's customers into visiting days | Traveller, step 2 | No |
| Territories | Shapes drawn on the map, one rep per territory in each team | Territory Studio | Only when you move customers to a rep there, which changes their salesman code |
| Areas of influence | The postcodes a warehouse serves | Territory Studio, imported from a postcode map | No. They filter which customers a team works with in Territory Studio |
| Units | A tree that splits the company by region or warehouse group | Organizational structure, if enabled | Yes, when visibility is restricted by unit |
In the Traveller, the rep's own territory appears as a thin dashed outline. Areas of influence don't appear in the Traveller.
Create, Save and Delete
| To | How |
|---|---|
| Create | In step 2, use Automatic planning or Build areas: automatically, by official boundaries, by squares or by drawing |
| Change | Click the area to rename it, edit its shape, split it or merge it |
| Keep for later | Click Save or Save as to keep the areas as Saved areas. Areas you don't save are gone when you leave the Traveller |
| Delete | Click the area, then Delete. To delete saved areas, open Load saved areas and use the bin. Deleting saved areas can't be undone |
Deleting an area doesn't move or delete any customer, and visits already saved to the calendar stay. WiseParts keeps no history of planner areas you can open; contact support if you need to know who changed them.
Fewer Areas in the Traveller
When a rep sees fewer areas than before, work through these checks in order.
- Open step 2. The map shows no areas in step 1, while you pick the days and the departure. Areas appear in step 2, Area assignments.
- Check the days and the customer filters. Areas are built from the customers due on the days you pick. Due in this period keeps customers whose next visit is due by the last planned day plus the days you choose, and leaves out customers with a visit already planned on those days. Customers visited since last time are no longer due, so a later week often gives fewer areas.
- Check whether the areas were saved. Areas you build are temporary until you save them. Start over, building again, or loading other saved areas replaces what is on the map.
- Check who planned last. A manager who plans for a rep works on that rep's areas.
- Check the rep's territory. Saved areas inherited through a territory disappear when the territory goes to another rep or is deleted.
If the rep sees fewer customers, not only fewer areas, a salesman code changed: see Fewer Customers.
Step 3: Calculate Routes
The Traveller ranks the customers of each day and builds the driving routes.
Customer Ranking
The Ranking weights slider balances two factors:
| Factor | What It Measures |
|---|---|
| Visit urgency | How due or overdue the customer is for a visit, by its cadence or by the time since the last visit |
| Sales trend | Recent purchasing changes — declining customers get higher priority |
Scheduled and Didn't Fit
- Scheduled — customers in the route, up to the visits that fit in the day
- Didn't fit — ranked customers left out, which you can add to the schedule by hand
Use Add more to fill the time still available.
Route Modes
Reuse the same departure and arrival every day. Best for reps who go home every night. Each day is routed on its own.
Depart on the first day and arrive on the last day — a continuous multi-day journey. Best for large territories that need overnight stays.
Comparison
The Comparison box shows both modes side by side, with the distance, the driving time and the cost, including hotel nights for Span entire plan. This helps you pick the most cost-effective approach for each plan.
Step 4: Calendar & Save
Review the plan before saving it to the calendar.
Route Summary
| Stat | Description |
|---|---|
| Total days | Number of days covered |
| Total stops | Customer visits across all days |
| Total distance | Kilometres to drive |
| Driving time | Estimated time on the road |
Calendar Preview
See every planned visit on a calendar, with times and customer names. Reorder stops, swap customers or change times before saving, or click Discard changes to go back.
Save to Calendar
Click Save to calendar to create a planned visit for each stop, linked to the customer, with the optimized start and end times. Then click Start a new plan to plan other days.
To remove a saved plan as a whole, open one of its visits in the Schedule and choose Remove plan…. Visits already done or reported stay.
Saved Preferences
The Traveller remembers, for each rep, the departure and arrival, the saved pairs, the visit windows and duration, the ranking weights and the saved areas in use.